Before you start
Have these details ready before you open the router’s settings:
- An active L2TPX subscription.
- Your VPN Username from the L2TPX account.
- Your VPN Password from the L2TPX account.
- The server IP address or hostname listed in your L2TPX account.
- The router’s admin username and password.
- A phone, tablet or computer connected to the router, to open the admin page and to test the connection afterwards.
Your L2TPX account shows your VPN username, VPN password and the available servers by country, including server IP addresses and hostnames. The available VPN server locations page explains what that list contains; the connection address itself always comes from your account. Your website login can be different from your VPN credentials.
Because the verified L2TP screen has no Pre-Shared Key field, you do not need the L2TP/IPsec Pre-Shared Key (PSK / Secret) for this setup.
What the L2TP tab on this firmware configures
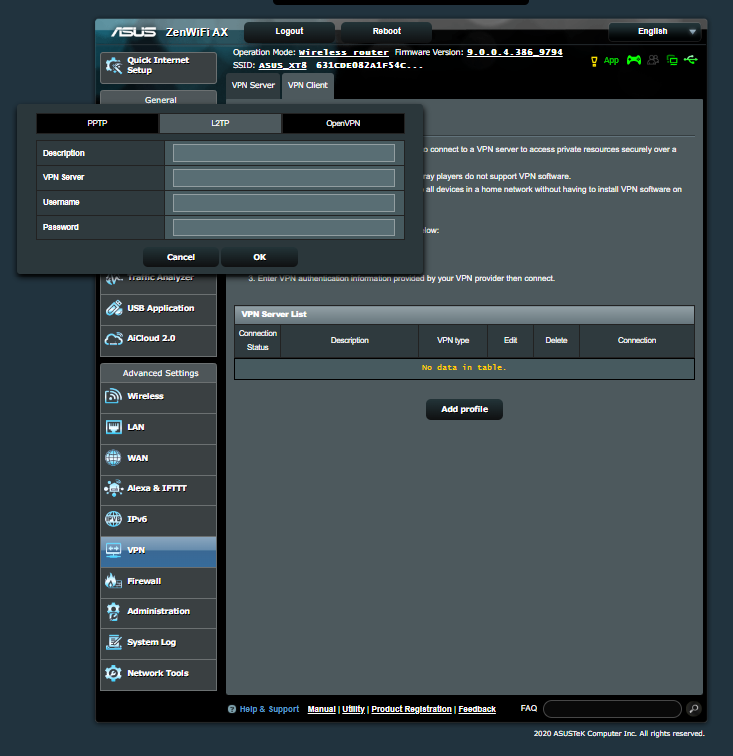
In the VPN Client area this firmware offers three profile types: PPTP, L2TP and OpenVPN. The L2TP tab shows four fields, Description, VPN Server, Username and Password, and no Pre-Shared Key (PSK / Secret) field.
So the profile you create here is an L2TP client profile without a pre-shared key. L2TPX supports plain L2TP on compatible devices and routers, and a plain L2TP profile uses the server address, your VPN username and your VPN password only.
Plain L2TP without IPsec does not add the IPsec protection layer. L2TP/IPsec adds that layer using a pre-shared key; this screen does not offer that field, so this guide documents plain L2TP and does not add a PSK anywhere. For the technical background, see how L2TP and IPsec work together.
Step-by-step setup
Follow the order below. The labels in bold are the labels shown in the verified interface; use them to find the same controls on your own screen.
Step 1 - Open the router admin page
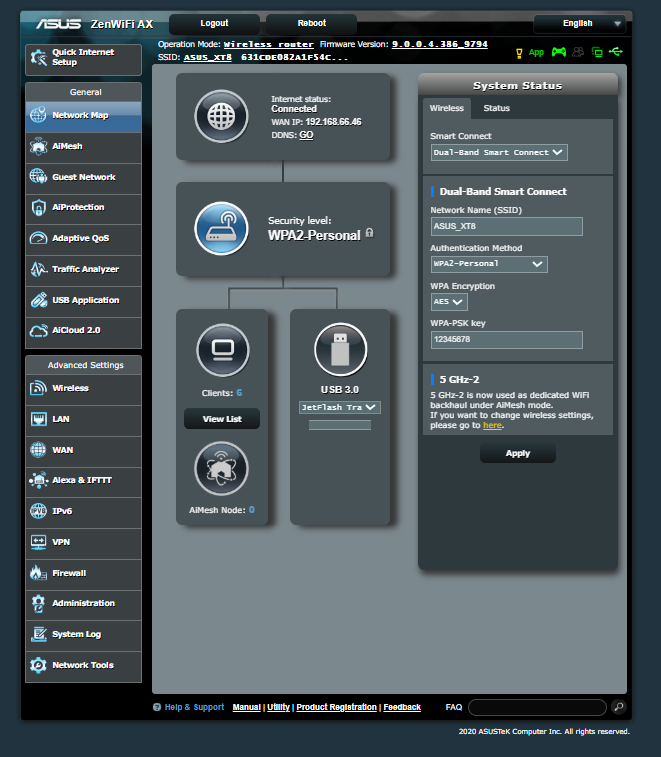
Connect a device to the router’s Wi-Fi or LAN, open a browser and enter the router’s admin address. The interface used for this guide showed the router’s own LAN address as 192.168.50.66 on its Network Map page; use the address your router actually shows. Sign in with the router’s admin credentials.
Step 2 - Check the mode and firmware in the header
The header of the admin interface shows Operation Mode: Wireless router and Firmware Version: 9.0.0.4.386_9794, next to the network name. If yours shows a different mode or firmware version, do not assume that the steps below match your unit.
Step 3 - Open VPN in the left sidebar
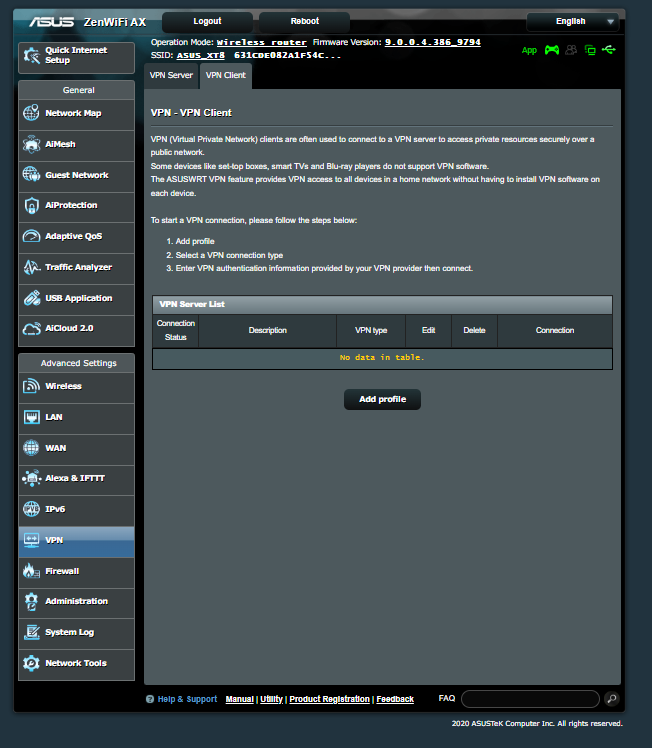
In the left menu, scroll to Advanced Settings and select VPN. The VPN page opens with two tabs, VPN Server and VPN Client.
Step 4 - Select the VPN Client tab
Select VPN Client. The page explains the VPN Client feature and lists the three steps ASUS asks you to follow: add a profile, select a VPN connection type, then enter the VPN authentication information provided by your VPN provider.
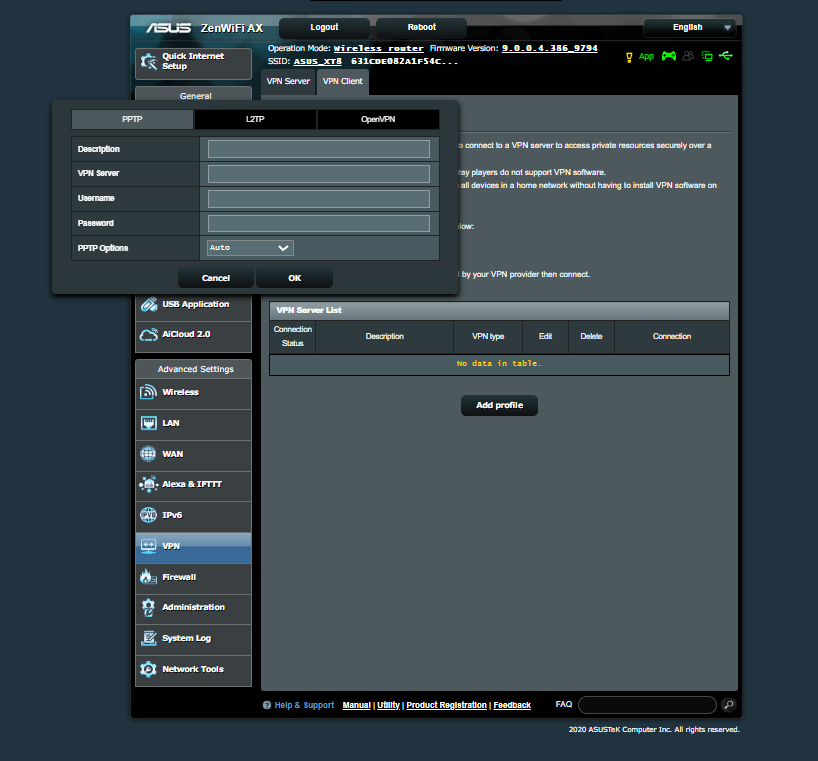
Step 5 - Select Add profile
Under VPN Server List, select Add profile. A dialog opens above the list with three tabs: PPTP, L2TP and OpenVPN.
Step 6 - Choose the L2TP tab
Select L2TP. The dialog shows four fields: Description, VPN Server, Username and Password.
Step 7 - Enter the L2TPX details
Fill in the four fields using the values in the field mapping table below, then select OK to save the profile. Cancel closes the dialog without saving. There is no Pre-Shared Key field in this dialog, so nothing else is entered here.
Step 8 - Start the connection
After you select OK, the profile appears in the VPN Server List with its description and VPN type in the matching columns. Use the control in the Connection column of that row to activate the profile, and read the Connection Status column to see the state of the connection.
Field mapping
| ASUS field | What to enter |
|---|
| Description | L2TPX, or any name you will recognise in the profile list. |
| VPN Server | The server IP address or hostname shown in your L2TPX account. |
| Username | Your L2TPX VPN Username. |
| Password | Your L2TPX VPN Password. |
The verified screenshots show VPN Server as an empty text box without hints or validation messages, so it is not verified whether this firmware accepts a hostname, an IP address or both. Enter the value exactly as your account shows it; if one form is rejected, try the other address listed for the same server.
No Pre-Shared Key (PSK / Secret) field is shown on this screen, so no PSK value is entered in this guide.
Troubleshooting
The profile saves but will not connect
Reopen the profile with Edit in the VPN Server List and check all four fields. Remove spaces that may have been pasted before or after a value. Confirm that the router itself has an internet connection, and that the server address is the one listed in your L2TPX account now.
Authentication fails
The VPN username and VPN password are the values in your L2TPX account panel, and they can differ from your website login. The router’s admin password is not a VPN credential. Copy the values again instead of retyping them.
The server address is not accepted
It is not verified whether this firmware accepts a hostname, an IP address or both. If one form does not work, enter the other address listed for the same server in your account.
There is no Pre-Shared Key field
That is expected on this firmware’s L2TP tab and it is not an error. A missing PSK field can mean the profile is plain L2TP rather than L2TP/IPsec. Do not search for a hidden PSK field or add one elsewhere; enter only the four fields the screen shows.
The connection does not start from the list
Use the control in the Connection column of the profile’s row and check the Connection Status column. If nothing changes, edit the profile and confirm the four fields again before changing anything else.
My ASUS interface looks different
This guide covers one model and firmware version. Another model, another ZenWiFi model or a newer firmware can show different tabs, fields and buttons. If your L2TP screen does include a Pre-Shared Key (PSK / Secret) field, that profile is L2TP/IPsec and the PSK from your account is entered there as well. If you are unsure, contact support with your model and firmware version before changing settings.
VPN Client and VPN Server are different areas
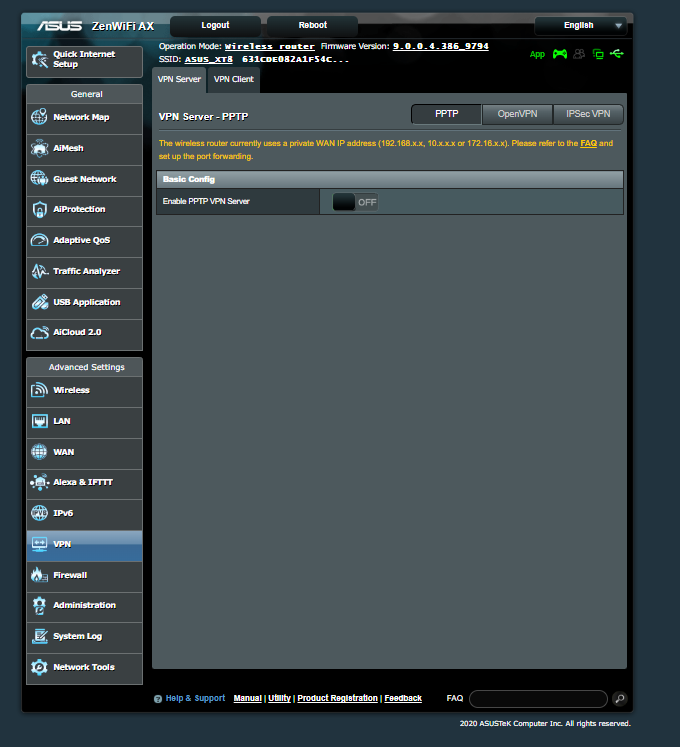
The same VPN menu also contains VPN Server. On the verified firmware that area offers PPTP, OpenVPN and IPSec VPN server options, and in the supplied screenshots the PPTP VPN server option is switched off.
A VPN server accepts incoming connections from outside into your home network. The VPN Client configured in this guide does the opposite: it connects your router out to L2TPX. Configure only the VPN Client for this setup, and leave the VPN Server area off unless you are deliberately running a separate server.
Frequently asked questions
Does this guide apply to other ASUS routers?
This guide was verified only against the ASUS ZenWiFi AX (XT8) running firmware 9.0.0.4.386_9794. Other ASUS models, other ZenWiFi models and other firmware versions can present different tabs and fields, so check your own model and firmware first.
Do I need to install a VPN app on my TV, console or set-top box?
No app is needed on devices that use this router: they use the router’s VPN connection. That is the practical benefit of configuring the VPN on the router instead of on every device.
Do I need the L2TPX Pre-Shared Key?
Not for this screen, because the L2TP tab has no PSK field. The Pre-Shared Key (PSK / Secret) is an L2TP/IPsec field and is entered only where the device asks for it.
Does plain L2TP encrypt my traffic?
L2TP provides the tunnel; it does not encrypt traffic by itself. Plain L2TP without IPsec does not add the IPsec protection layer that L2TP/IPsec provides with a pre-shared key.
Can I use the same L2TPX details on my phone as well?
Yes. The VPN username and VPN password are the same across supported connection methods; the guide for each device shows which fields that device needs.
Keep your connection details private
Keep your VPN username, VPN password and the L2TP/IPsec Pre-Shared Key private. Do not post screenshots of the profile dialog with real values in them, and do not send credentials in a support message.